Cam-Scanner using openCV
In our daily life a lot of times we need to scan some documents or notes for future reference and, a lot of mobile apps are available to perform such tasks. But if you are a beginner to image processing or computer vision you can learn a lot of things by creating such projects today I am going to tell you how to build your own cam scanner using python and openCV.
The tasks we have to do are
- First detect edges of the document you are going to scan.
- Now we will use these edges to find the outline which represents the piece of paper being scanned.
- Now we will try to find top-down view of the document by applying perspective transform method.
Example of perspective transform is shown bellow which shows about the working of perspective transform.
By commenting out the lines
T = threshold_local(warped, 15, offset = 3, method = "gaussian")
warped = (warped > T).astype("uint8") * 255
you can get an output with noise not removed and image not sharpened.
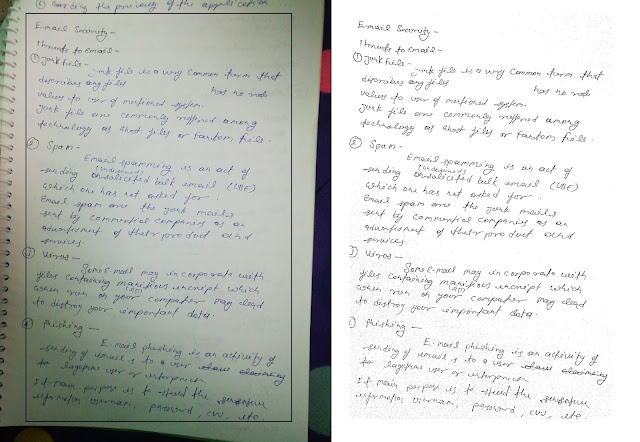
This posts will show two methods for document scanning
- one is for image scanning when image does not contains a lot of noise and it is visible sufficiently.
- second for those documents which contain a lot of noise and are not very much visible.
Bot the methods can be achieved just by tempering 2 lines of codes in same source code.
Perspective transform
The first function places dots at the four corners of the document and the second function is our main function which takes the document scanned at any angle and fixes it in a window completely.
you need to store this code in "transform.py" file or whatever name you want to give. We will use these functions in our next module.
# following lines show how to import different packages
import numpy as np
import cv2

def order_points(pts):
    rect = np.zeros((4, 2), dtype = "float32")

    s = pts.sum(axis = 1)
    rect[0] = pts[np.argmin(s)]
    rect[2] = pts[np.argmax(s)]
    diff = np.diff(pts, axis = 1)
    rect[1] = pts[np.argmin(diff)]
    rect[3] = pts[np.argmax(diff)]

    return rect

def four_point_transform(image, pts):
    rect = order_points(pts)
    (tl, tr, br, bl) = rect


    widthA = np.sqrt(((br[0] - bl[0]) ** 2) + ((br[1] - bl[1]) ** 2))
    widthB = np.sqrt(((tr[0] - tl[0]) ** 2) + ((tr[1] - tl[1]) ** 2))
    maxWidth = max(int(widthA), int(widthB))
    heightA = np.sqrt(((tr[0] - br[0]) ** 2) + ((tr[1] - br[1]) ** 2))
    heightB = np.sqrt(((tl[0] - bl[0]) ** 2) + ((tl[1] - bl[1]) ** 2))
    maxHeight = max(int(heightA), int(heightB))
    dst = np.array([
  [0, 0],
  [maxWidth - 1, 0],
  [maxWidth - 1, maxHeight - 1],
  [0, maxHeight - 1]], dtype = "float32")

    M = cv2.getPerspectiveTransform(rect, dst)
    warped = cv2.warpPerspective(image, M, (maxWidth, maxHeight))

    return warped
Main Code
The following code uses above functions for straightening of the document and then it removes noises from the picture and makes it clear if needed. You can place both pieces of codes transform.py as well as the following code but you will need to make some modifications in the code.
Or you can store the following code with name "xyz.py", for running the project you need to run it in the following form:
python xyz.py -i <name of image>
or
python xyz.py --image <name of the image>
Or you can store the following code with name "xyz.py", for running the project you need to run it in the following form:
python xyz.py -i <name of image>
or
python xyz.py --image <name of the image>
from transform import four_point_transform
from skimage.filters import threshold_local
import numpy as np
import argparse
import cv2
import imutils

# we are using argparse for taking the address of image as argument

ap = argparse.ArgumentParser()
ap.add_argument("-i", "--image", required = True,
 help = "Path to the image to be scanned")
args = vars(ap.parse_args())

# now we will loade the image from th provided address and
# clone it in a variable called orig

image = cv2.imread(args["image"])
ratio = image.shape[0] / 500.0
orig = image.copy()
image = imutils.resize(image, height = 500)

# now we will convert the image in gray scale for reducing dimensions.


gray = cv2.cvtColor(image, cv2.COLOR_BGR2GRAY)
gray = cv2.GaussianBlur(gray, (5, 5), 0)
edged = cv2.Canny(gray, 75, 200)

# Step one comes here with showing the result detecting edges.

print("STEP 1: Edge Detection")
cv2.imshow("Image", image)
cv2.imshow("Edged", edged)
cv2.waitKey(0)
cv2.destroyAllWindows()


# now we wil find the contours in the edged image, keeping only the largest ones, and initialize the screen contour

cnts = cv2.findContours(edged.copy(), cv2.RETR_LIST, cv2.CHAIN_APPROX_SIMPLE)
cnts = imutils.grab_contours(cnts)
cnts = sorted(cnts, key = cv2.contourArea, reverse = True)[:5]

for c in cnts:
 # approximate the contour
 peri = cv2.arcLength(c, True)
 approx = cv2.approxPolyDP(c, 0.02 * peri, True)

 if len(approx) == 4:
  screenCnt = approx
  break

# showing the the outline of the paper
print("STEP 2: Find contours of paper")
cv2.drawContours(image, [screenCnt], -1, (0, 255, 0), 2)
cv2.imshow("Outline", image)
cv2.waitKey(0)
cv2.destroyAllWindows()

# now we will use four point transform to obtain a top-down of the image
warped = four_point_transform(orig, screenCnt.reshape(4, 2) * ratio)


warped = cv2.cvtColor(warped, cv2.COLOR_BGR2GRAY)
T = threshold_local(warped, 15, offset = 3, method = "gaussian")
warped = (warped > T).astype("uint8") * 255

# following code is to view the real image and the scanned image
print("STEP 3: Apply perspective transform")
cv2.imshow("Original", imutils.resize(orig, height = 650))
cv2.imshow("Scanned", imutils.resize(warped, height = 650))
cv2.imwrite('output.jpg',warped)
cv2.waitKey(0)
T = threshold_local(warped, 15, offset = 3, method = "gaussian")
warped = (warped > T).astype("uint8") * 255
you can get an output with noise not removed and image not sharpened.
an example is shown bellow:
without commenting:
click the image for proper viewAfter commenting out those lines mentioned above.
click the image for proper viewDownload the complete source code:
Hope you enjoyed this article, please comment any query or suggestion in the comment section


Wow i loved it
ReplyDeleteYour website is ranked
ReplyDeletefake link
ReplyDeleteDownload links?
Delete